Welcome to the Daisy Ecosystem!
This will walk you through the process of getting started with the Daisy.
If you plan on using Arduino, check out Getting Started in Arduino.
Steps
1. Upload an Example Program
First we’re going to upload the Blink example to your Daisy hardware using our Web Programmer tool.
In order to use this tool you will need the following:
- Google Chrome web browser (version 61 or newer)
- Daisy Hardware
- Micro USB Cable
Here are the steps for uploading Blink to the Daisy:
- In a Chrome browser window, navigate to the Electrosmith Web Programmer
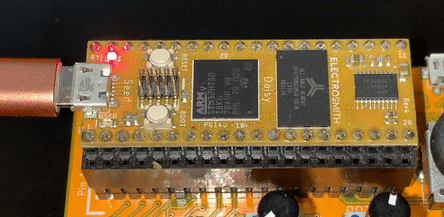
- Once there, connect the Daisy Seed development board to your computer using a micro USB cable. (If you are using Windows you may have to reset your USB driver before proceeding. See our Zadig wiki page for full instructions.)
- Put your Daisy into flashable mode by holding down the BOOT button, and pressing the RESET button. Once you release the RESET button you can let go of the BOOT button (You’ll know you performed the button combo correctly if the USER LED on your Daisy stops flashing)
- Connect Daisy as a DFU device by clicking the “Connect” button at the top of the Web Programmer page
- In the dialog box that opens, select “DFU in FS Mode” and then click “Connect”
- Press the “Flash Blink!” button.
Upon a successful flash you should see the following output:
Erasing DFU device memory
Copying data from browser to DFU device
Wrote 34016 bytes
Manifesting new firmware
Done!
The onboard LED on your Daisy Seed should now be blinking!
2. Next Steps
Firmware Development
- Follow this Wiki page to set up your development environment. If you plan on using Arduino, check out the Getting Started Arduino edition.
- DaisySP is a DSP library specifically tailored for the Daisy environment. Browse the reference documentation.
- libDaisy is a hardware abstraction library which provides easy access to things such as ADC reads, GPIO, MIDI drivers, and more. Browse the reference documentation here
- DaisyExamples is home to all of our example programs and circuits for the Daisy platform and associated hardware
- DaisyDuino is an Arduino library for the Daisy platform and provides a configurable audio callback, DSP library, and board support for Daisy hardware
- pd2dsy is a utility for converting Vanilla Pure Data patches to firmware that can run on the Daisy.
- Oopsy is a Max package that allows for exporting and running gen~ patches on the Daisy.
- Web Programmer is an online tool capable of flashing precompiled binaries to your Daisy device using a graphical interface. You can browse our available programs, or upload your own
Circuit Design
- The Daisy Seed pinout diagram is located on our Wiki
- To start adding your own circuits to the Daisy, you can browse our Seed example programs which are each accompanied by a schematic, breadboard diagram, and Fritzing file. This is a great way to get started with basic circuit design such as audio IO, ADC inputs, using potentiometers, etc.
- Check out our Hardware GitHub repo for the Daisy Seed schematic, as well as reference designs for Eurorack modules, Guitar pedals, and our evaluation platforms. For each evaluation platform (Pod, Patch, Petal, Field) you will find a schematic PDF and EAGLE file located within the GitHub repo.
- If you plan on designing your own PCB for the Daisy, you can find the EAGLE part in our Electrosmith EAGLE Library
Community and Support
Here are some ways to get support and connect with other users and developers:
- Join the Daisy Forum
- Make a GitHub Issue on the repo that best matches your topic
- Join the Daisy Discord Server
