Oopsy Update Prerelease! Want to Try the New Features Early?

The team has been working hard on a new Oopsy update, and it’s going to be released SOON!

But we know that you’re eager to try it, so we are doing a prerelease! Your weekend plan was full of Oopsy-related activity anyway, right?

Here are the updates!!

JSON Interface Expanded & Upgraded :muscle:
Do you have a custom hardware based on the Daisy Seed or Daisy Patch SM?
The JSON interface has been significantly expanded and upgraded! Now you can quickly describe your own custom hardware for use within Oopsy. Here’s a quick rundown of the process.

C++ Inserts For Specific Customization :keyboard:
Want to do intricate low-level tasks such as multi-layer saved parameter inputs or custom OLED displays?
Within the framework of the JSON hardware description, you can now build custom C++ classes to run arbitrary code within your patcher!
(Note: the C++ inserts can only be called once per audio block – not on every sample)
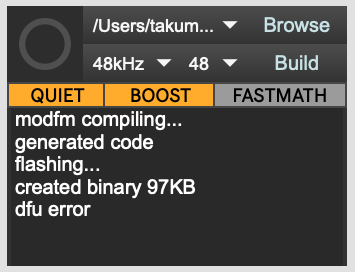
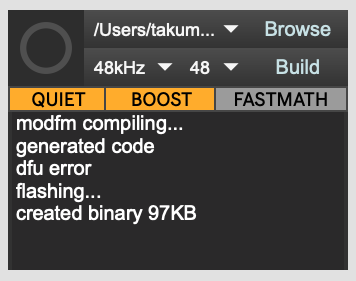
Bootloader :weight_lifting_woman:
Got a program that exceeds 128kb? Fear not! With the Daisy bootloader, you can now flash much larger programs!! The Daisy bootloader can be selected from the JSON description. Or the easiest way is through the Daisy Web Programmer under the “advanced” tab. Edit: scroll further down this thread to see a direction on how to use this.

Want to Try These Early? :eyes:
We would love for you to try these updates before the official release!!

The new branch is bootloader-additions
The new PR is here

Please follow these steps:

  1. Go to oopsy’s GitHub page

  2. Click on the green “Code” button and then copy the HTTPS link that’s in the local clone.

  3. Open up terminal and run git clone https://github.com/electro-smith/oopsy.git
    That link is what you copied earlier (or you could just copy and paste this whole command line)
    The git-cloned version of the repo should now be in your user/home folder.

  4. Run cd oopsy

  5. Run git checkout bootloader-additions from that oopsy packages’ folder.

  6. Run the ./install.sh script, which will rebuild libDaisy to the version required for the update.

  7. Create a backup of the oopsy folder that you already had on your computer (Documents → Max 8 → Packages) and store it somewhere else safe. Then move the new oopsy folder into that Max package folder manually to replace the old.

Note: it does have to be a git-cloned version of the repo; you can’t test it out from the prepackaged release. However, we will have a pre-compiled bundle when we do the actual release.

Also, if you’ve been using the dev branch for a while, it contains all of these improvements and more.

Please feel free to reply to this post with your feedback!
Looking forward to seeing what you’ll do with this update!!

4 Likes

Ah this is fantastic. I’ve been working in a multi-effect beat slicer finalizer delay/verb effects bomb thing for my Field and it’s already bigger than 128k.
Here’s to hoping the Petal125 has midi in… (likely not)

1 Like

Nice! For sure, reverb can get large real quick, so I hope that this update will be helpful!

Hey Takumi, this update is great to see!

I tried running some minimal examples, and here’s a first couple of quick notes:

  • I had to add “som”: “seed” to the JSON for a minimal seed example. I wonder if the “som” field could default to “seed” if not given, rather than require it to be added? Would make older JSON files more like to work out of the box.

  • Led component output seems to be inverted – sending 0.0 to [out 3 led] on a JSON with “component”: “Led” will light the LED at maximum brightness; sending 1.0 to [out 3 led] outputs zero brightness. I’m following the breadboard layout of DaisyExamples/seed/Knob at master · electro-smith/DaisyExamples · GitHub and making a JSON as below. The generated code is calling directly into daisy::Led::Set(float val) with the gen~ patch output signal, so the problem I guess is somewhere deeper in the libdaisy code. (Though apparently I wrote some of that PWM stuff, so maybe it’s my fault?)


{
	"name":"seed_knob",
	"som": "seed",
	"defines": {
	},
	"components": {
		"knob1": {
			"component": "AnalogControl",
			"pin": 21
		},
		"led1": {
			"component": "Led",
			"pin": 28
		}
	},
	"aliases": {
		"knob": "knob1",
		"ctrl": "knob1",
		"led": "led1"
	}
}
2 Likes

Hi Graham!

Thank you so much for trying out the new update and also for the feedback! We really appreciate it.

We’ll discuss about your first suggestion and then have a closer look at the inverted mapping situation.

I investigated more and the inverted mapping is confusing me now.

I tried checking out DaisyExamples and flashing by modifying the Knob example to output different LED values, and the output looks fine as expected. But the calls to Led::Set() in both this and the oopsy-generated code look the same. Could it be due to different tagged revisions of libdaisy?

BTW in the process of this, I figure perhaps we should add another output component, perhaps call it PWM, that would be comparable to Arduino analogWrite (but using 0.f - 1.f range).

Rationale: I’ve heard from several users, both here on the forum and elsewhere, the desire for doing PWM on GPIOs. They know it’s not as precise and has less effective bitdepth than using DACs, but sometimes that’s still desirable for getting more outputs and quite enough resolution for some cases.
So far the recommendation has been to use the “Led” component to do this, but having now looked at the Led implementation I can see this isn’t ideal, as the value always goes through a cubic shaping function before doing PWM. That cubic shaping works well for LED response but is maybe not what you want for a raw PWM output.

It would be a pretty trivial addition – could be entirely in Oopsy or could be an addition to libdaisy. I’m happy to concoct a pull request or do it as a branch on tree if that would help.

2 Likes

The JSON component has an “invert” key that is set to “true” by default. This sets the init parameter for the libDaisy Led class. This matches the polarity of the Daisy Pod, for example. If you want to change the value, you can do so like this:

{
    "led1": {
		"component": "Led",
		"pin": 28,
		"invert": "false"
    }
}
2 Likes

Please, tell me, step by step: how i can use it?

I added more directions on how to install the prerelease in the original post.

For the Bootloader, please follow these steps:

  1. The JSON files should be in the source folder of the oopsy package. You can create a new custom JSON or just use a JSON file that’s already there. For example, I’m using the pod.json file. In the top-level item of that file, add the line app_type": "BOOT_SRAM. So in pod.json, it looks like this.
{
	"name": "pod",
	"som": "seed",
	"app_type": "BOOT_SRAM",
	"defines": {
		"OOPSY_TARGET_POD": 1,
		"OOPSY_TARGET_HAS_MIDI_INPUT": 1,
		"OOPSY_HAS_ENCODER": 1
	},
	"max_apps": 8,
	"display": {},
	"audio": {
		"channels": 2
	},
	"components": {
		"sw1": {
			"component": "Switch",
			"pin": 27
		},
		"sw2": {
			"component": "Switch",
			"pin": 28
		},
		"knob1": {
			"component": "AnalogControl",
			"pin": 21
		},
		"knob2": {
			"component": "AnalogControl",
			"pin": 15
		},
		"encoder": {
			"component": "Encoder",
			"pin": {
				"a": 26,
				"b": 25,
				"click": 13
			}
		},
		"led1": {
			"component": "RgbLed",
			"pin": {
				"r": 20,
				"g": 19,
				"b": 18
			}
		},
		"led2": {
			"component": "RgbLed",
			"pin": {
				"r": 17,
				"g": 24,
				"b": 23
			}
		}
	},
	"aliases": {
		"switch": "sw1",
		"button": "sw1",
		"switch1": "sw1",
		"button1": "sw1",
		"switch2": "sw2",
		"button2": "sw2",
		"encswitch": "encoder_rise",
		"enp": "encoder_press",
		"press": "encoder_press",
		"knob": "knob1",
		"ctrl": "knob1",
		"ctrl1": "knob1",
		"ctrl2": "knob2",
		"led": "led1"
	}

}

Notice the newly added app_type”: “BOOT_SRAM at the top.

  1. With your Daisy in the physical world, put it into bootloader mode (DFU in FS Mode) as usual by press and hold boot, press and hold reset, let go of reset, and let go of boot. Then, go to Daisy Web Programmer, click “Connect” and choose Daisy, click “Flash Bootloader Image” in the “Advanced”. Now, Daisy bootloader is flashed on your Daisy!

  2. And then, press and let go ‘reset’ and then press and let go ‘boot’. You should see your LED breath or slowly glow and fade repeatedly. This indicates that Daisy bootloader is ready!!

  3. Open up the oopsy max patch of your choice. Then, choose that custom JSON file using the “Browser” button. You may need to expand that window to see the “Browser” button.

  4. Finally, click on the button object as usual and it should flash using the Daisy bootloader. It might say ‘DFU error’ at the end but it seems to flash successfully. Let me know if it does for yours too.

After_New

To confirm adding that line in the JSON file is what made this process work, I tried step 3 through 5 WITHOUT the app_type”: “BOOT_SRAM in the JSON file and it did NOT flash successfully. The following gets displayed. It’s slightly different from the previous one. And if I remember correctly, Daisy’s LED just continued to breath…

Before_New

And you can keep using the Daisy bootloader without needing to flash the Bootloader Image every time.
So simply follow step 3 through 5 (no need to do step 2).
UNLESS, you go into DFU in FS Mode and, let’s say for example, flash a blink example into the internal flash. Then, you have to flash the Bootloader Image if you want to use the Daisy Bootloader again (so go back to step 2). To check if your Daisy has bootloader on it or not is to do step 3 and see if the LED slowly glows or not.

Let me know if you have any questions. And please feel free to share with us what you think especially if you were able to flash a program that’s bigger than 128KB!

3 Likes

Hello. this is a very cool manual, thank you very much. And by the way, I got lessons with Pure Data from your videos, thank you very much for your work.

By the way, In the new Oopsy beta, I encountered such a problem: my firmware with a large number of midi parameters hangs during operation. With the old release everything works fine. Due to the huge number of midi controls, the json blown up and the firmware becomes larger than 128kb. But, something in the oopsy gen2cpp translator in the new beta release is not finalized, and a daisy patch is crush.

Glad to hear the manual was helpful! And thanks for watching :slight_smile:

We appreciate your trying out the prerelease.
That’s an interesting issue. Please feel free to provide more details about it (even posting the gen~ patch if you’re ok with it) as the oopsy~ team is monitoring this thread. Thank you.

Hi guys…stoked to see the development and looking forward to get access to more space.
But…so far no dice as the Petal and the Version Template are broken.

Here is the verbose error message :

gen~: exported: Monterey:/Users/saschaawhaber/Documents/Max 8/Library/NLM GEN~ patches/flasher.json
gen~: exported: Monterey:/Users/saschaawhaber/Documents/Max 8/Library/NLM GEN~ patches/flasher.cpp
oopsy-verbose: script start petal 48kHz block48 “/Users/saschaawhaber/Documents/Max 8/Library/NLM GEN~ patches/flasher.cpp” boost
oopsy-verbose: stop success dictionary u284001526
oopsy-verbose: start success dictionary u309001537
oopsy-verbose: “using build tools found in /usr/local/bin”
oopsy-verbose: “Target petal configured in path /Users/saschaawhaber/Documents/Max 8/Packages/oopsy/source/petal.json”
oopsy-verbose: “build_path /Users/saschaawhaber/Documents/Max 8/Packages/oopsy/source/build_flasher_petal/build”
oopsy-verbose: “Building to /Users/saschaawhaber/Documents/Max 8/Packages/oopsy/source/build_flasher_petal”
oopsy-verbose: “Will upload from /Users/saschaawhaber/Documents/Max 8/Library/NLM GEN~ patches/flasher.cpp by writing to:”
oopsy-verbose: " /Users/saschaawhaber/Documents/Max 8/Packages/oopsy/source/build_flasher_petal/flasher_petal.cpp"
oopsy-verbose: " /Users/saschaawhaber/Documents/Max 8/Packages/oopsy/source/build_flasher_petal/Makefile"
oopsy-verbose: " /Users/saschaawhaber/Documents/Max 8/Packages/oopsy/source/build_flasher_petal/build/flasher.bin"
oopsy-verbose: “oopsy generated code”
oopsy-verbose: “oopsy compiling…”
oopsy-verbose: compiling…
oopsy-verbose: “generated code”
oopsy-verbose: “oopsy compiler error”
oopsy-verbose: “Error: Command failed: export PATH=$PATH:/usr/local/bin && make clean && make”
oopsy-verbose: “In file included from flasher_petal.cpp:273:”
oopsy-verbose: “…/genlib_daisy.h: In member function ‘int oopsy::GenDaisy::run(oopsy::AppDef*, int)’:”
oopsy-verbose: “…/genlib_daisy.h:588:50: error: ‘struct json2daisy::Daisy’ has no member named ‘ClearLeds’”
oopsy-verbose: " 588 | hardware.ClearLeds();"
oopsy-verbose: " | ^"
oopsy-verbose: “…/genlib_daisy.h:603:58: error: ‘struct json2daisy::Daisy’ has no member named ‘SetRingLed’”
oopsy-verbose: " 603 | hardware.SetRingLed((daisy::DaisyPetal::RingLed)i,"
oopsy-verbose: " | ^
~"
oopsy-verbose: “…/genlib_daisy.h:603:77: error: ‘daisy::DaisyPetal’ has not been declared”
oopsy-verbose: " 603 | hardware.SetRingLed((daisy::DaisyPetal::RingLed)i,"
oopsy-verbose: " | ^~"
oopsy-verbose: “In file included from flasher_petal.cpp:273:”
oopsy-verbose: “…/genlib_daisy.h:860:50: error: ‘struct json2daisy::Daisy’ has no member named ‘UpdateLeds’”
oopsy-verbose: " 860 | hardware.UpdateLeds();"
oopsy-verbose: " | ^
~"
oopsy-verbose: “make: *** [build/flasher_petal.o] Error 1”
oopsy-verbose:
oopsy-verbose: " at ChildProcess.exithandler (node:child_process:397:12)"
oopsy-verbose: " at ChildProcess.emit (node:events:394:28)"
oopsy-verbose: " at maybeClose (node:internal/child_process:1067:16)"
oopsy-verbose: " at Socket. (node:internal/child_process:453:11)"
oopsy-verbose: " at Socket.emit (node:events:394:28)"
oopsy-verbose: " at Pipe. (node:net:672:12) {"
oopsy-verbose: " killed: false,"
oopsy-verbose: " code: 2,"
oopsy-verbose: " signal: null,"
oopsy-verbose: " cmd: ‘export PATH=$PATH:/usr/local/bin && make clean && make’"
oopsy-verbose: }
oopsy-verbose: “In file included from flasher_petal.cpp:273:”
oopsy-verbose: “…/genlib_daisy.h: In member function ‘int oopsy::GenDaisy::run(oopsy::AppDef*, int)’:”
oopsy-verbose: “…/genlib_daisy.h:588:50: error: ‘struct json2daisy::Daisy’ has no member named ‘ClearLeds’”
oopsy-verbose: " 588 | hardware.ClearLeds();"
oopsy-verbose: " | ^"
oopsy-verbose: “…/genlib_daisy.h:603:58: error: ‘struct json2daisy::Daisy’ has no member named ‘SetRingLed’”
oopsy-verbose: " 603 | hardware.SetRingLed((daisy::DaisyPetal::RingLed)i,"
oopsy-verbose: " | ^
~"
oopsy-verbose: “…/genlib_daisy.h:603:77: error: ‘daisy::DaisyPetal’ has not been declared”
oopsy-verbose: " 603 | hardware.SetRingLed((daisy::DaisyPetal::RingLed)i,"
oopsy-verbose: " | ^~"
oopsy-verbose: “In file included from flasher_petal.cpp:273:”
oopsy-verbose: “…/genlib_daisy.h:860:50: error: ‘struct json2daisy::Daisy’ has no member named ‘UpdateLeds’”
oopsy-verbose: " 860 | hardware.UpdateLeds();"
oopsy-verbose: " | ^
~"
oopsy-verbose: “make: *** [build/flasher_petal.o] Error 1”
oopsy-verbose:
oopsy-verbose: “compiler error”

Does anyone have the same problem when trying to compile with either Petal or Versio ?
Could it be my oopsy cloning just went bad ?
I saved my old oopsy folder and went back to verify i can still flash, and that works.
Let me know if i can do something else to test…

Thank you for the detailed report, Sascha. I don’t have Petal nor Versio to recreate this error, I’m sorry. But hopefully someone who has them can confirm your error or troubleshoot with you.

And the team is keeping an eye out on this thread too, so we greatly appreciate your bringing this up.

Hi Takumi,

you do not need the hardware…just set the programer to either “Petal” or “Versio” and press Compile.
Then the compiler error happens…it’s not even reaching flashing stage
At least it does not work here.

Oh yeah, that’s true :man_bowing:

I set it to “Petal” and tried to flash using my Daisy Pod, and I got a compiler error with pretty much the same exact verbose error message as the one you posted. So it’s not just you!

Thanks again for bringing this up. We’ll have a closer look to it.

1 Like

I’m trying this prerelease because I want bipolar cv input support for my patch.Init(). It looks like that is working as expected, which is great!

It took me a little while to update my patches due to some breaking changes with the input and output alias names. I had to rename:

Inputs (Params):

  • sw → toggle

Outputs:

  • cv → cvout
  • gate1 → gateout1
  • gate2 → gateout2

Comparing the old and new json mapping files, this mostly makes sense.

I got really confused though, because I think of the patch.init() as having a switch and a button. I realize they are both a switch from the hardware’s perspective and one is a toggle switch and one is a momentary switch. But from a human UX perspective, maybe most people would think of them as a switch and button? Anyway,I tried renaming my “sw” param to “switch” and it took me a while to realize this is actually the button on the hardware and I need to use the alias “toggle” instead. The “switch” alias seems backwards to me. I would alias “switch” to sw2, or … actually, comparing the main branch with the bootloader-additions branch, it looks like you swapped sw1 and sw2? That might be part of the confusion:

See the main branch:

vs the bootloader-additions branch:

Is there a reason for swapping sw1 and sw2 like that?

In any case, I suggest you make a short upgrade guide that tells people how to rename their params and outputs. That will save existing users a lot of hassle when you release this update.

PS - I am glad you renamed the mapping “patch_sm” to “patch_init”. As a newbie to all this a few months ago, I was really confused when I first tried to get a patch.Init() working with Oopsy, until I eventually figured out “sm” is referring to the Daisy submodule that patch.Init() is built on. That was not obvious. BTW this rename is another breaking change you should give people a heads up about.

1 Like

Hello Adam!

First of all, thank you for trying out the prerelease! I’m glad to hear that it resolved the issue!

There should be a more detailed documentation when the new oopsy release is launched so your feedback will be super helpful when we’re putting it together. Thanks so much!!

I’ll add this to the thread.
It’s about the audio output being inverted from the value that’s in the patch, similar to the PWM output case earlier in this thread. The main concern is if it’ll be changed in a future release which will alter the behavior of the current patch.

Hi guys,

is there a new version with a fix for the Petal preset in range ?
I really would like to try out the bootloader options…
There is probably just a typo in a json file, but that is beyond my scope of understanding how they work.