I built a new computer over the weekend and installed the new Ubuntu 24.04, so I thought I’d share a few notes about how I got everything working; not just flashing a Daisy Seed with the ST LINK-V3 MINI Debugger, but enabling full debugging functionality.
-
Follow the instructions for setting up the toolchain at 1d. Installing the Toolchain on Linux · electro-smith/DaisyWiki Wiki · GitHub … BUT with a few additions / exceptions:
-
sudo apt install libusb-1.0-0-dev -
Don’t install
openocdfrom the Ubuntu repo if you’re using a ST LINK Debugger. Use the STMicroelectronics-modified OpenOCD found at GitHub - STMicroelectronics/OpenOCD: STMicroelectronics customized version of OpenOCD supporting STM32 MCUs and MPUs.- Building and installing is a typical
./bootstrap && ./configure && make && sudo make installaffair. The--enable-stlinkflag is set by default; you don’t need to pass it to./configure.
- Building and installing is a typical
-
Install
libtinfo5andlibncurses5. This is required becausearm-none-eabi-gdbin the version of the Arm GNU Toolchain that we’re using (10-2020-q4-major December 11 2020) needs it for terminal handling, which is how the Cortex-Debug extension in VS Code interacts with it. However, these older libraries are not available in the Ubuntu 24.04 repo; I got them from https://packages.ubuntu.com/jammy/libtinfo5 and https://packages.ubuntu.com/jammy/libncurses5 and installed them withdpkg -i.- Note: using
openocd/noble 0.12.0-1build2in the Ubuntu 24.04 repo will generally work, but I’ve noticed wonkiness with debugging (breakpoints out of sync, registers unavailable, etc.). The STMicroelectronics version cleared this right up. libncurses6, which was already on my fresh Ubuntu 24.04 install, will not work for our debugging setup. If you don’t install the olderlibtinfo5andlibncurses5libraries, you might flail and rage for hours over the Cortex-Debug extension refusing to halt at your breakpoints. (Ask me how I know. )
)
- Note: using
-
-
You probably don’t need to install STM32CubeProgrammer. I’ve read this is required in several places on the Internet, but it was not in my case. What IS necessary, however, is to deploy the appropriate UDEV rules so your debugger is accessible via USB. Here are the UDEV rules that STM32CubeProgrammer installs by default. st-link-udev-rules.zip (5.4 KB) Just unzip in an empty directory then:
sudo cp *.* /etc/udev/rules.d/ && sudo systemctl reload udev && sudo udevadm trigger -
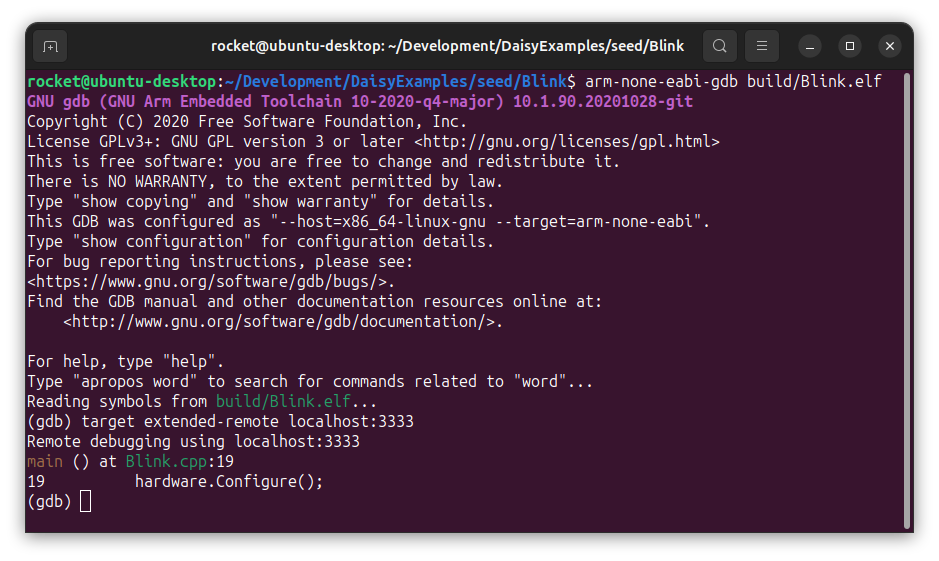
I strongly recommend confirming you can debug in the terminal before messing with VS Code and Cortex-Debug. When you know what Cortex-Debug is doing behind the scenes, it will help you troubleshoot problems later. Command line debugging can be as simple as opening two terminal windows and starting
openocdin one, andarm-none-eabi-gdbin the other. For example, using the Blink example, in terminal A:openocd -s /usr/local/share/openocd/scripts -f interface/stlink.cfg -f target/stm32h7x.cfgAt this point, the LED on the ST LINK-V3 MINI should be flashing red and green (or whatever your debugger does) and a
gdbserver is listening on port 3333. Now, in terminal B:arm-none-eabi-gdb build/Blink.elf.(NOTE: if you didn’t install the older
libtinfo5andlibncurses5libraries, this command will fail now, and Cortex-Debug will not halt at breakpoints in VS Code later.)Once the symbols for
build/Blink.elfare loaded, connect to thegdbserver started byopenocda moment ago:(gdb) target extended-remote localhost:3333If you can connect successfully, you’re good to go. But for bonus points, you can see above I’m halted at
main(). That’s because I gave abreak mainand then a couplelay nextcommands. A-a-and we’re in.
Important before moving on to VS Code: to stop debugging, type
quitin terminal B and hitCtrl+Cin terminal A. -
If things are working to this point, then setting up Cortex-Debug and VS Code are trivial, but a few observations (some obvious, some not-so-much):
-
Change your configuration name to
Linux, and make Intellisense work by selecting the correct compiler (10-2020-q4-major December 11 2020).
-
There is no need to mess with any custom paths in global Cortex-Debug settings. The tools this extension uses are all on your PATH if you’ve followed along. Any tweaks are better-made in the local
launch.jsonandtasks.jsonfiles, IMHO.- In
launch.json, update the line"runToMain": trueto"runToEntryPoint": "main"to get rid of the warnings. - Use
"showDevDebugOutput": "raw"for handy debug output in the Debug Console. - Also in
launch.jsonthere’s this:
- In
-


"configFiles": [
        "interface/stlink.cfg",
        "target/stm32h7x.cfg"
      ],
But I like to full-qualify them (not necessary; I’m just the “belt and bracers” type):
"configFiles": [
        "/usr/local/share/openocd/scripts/interface/stlink.cfg",
        "/usr/local/share/openocd/scripts/target/stm32h7x.cfg"
      ],
- I’ve made no changes to
tasks.json. I’ve seen a lot of folks have to comment stuff out re: thebuild_all_debugtask, but that’s not necessary on my new installation. (Whether or not we need a task that rebuilds the universe every time—IF it were working at all—is a different topic. )
)
So there it is. All of THAT, to get to THIS (which is blissful, BTW).
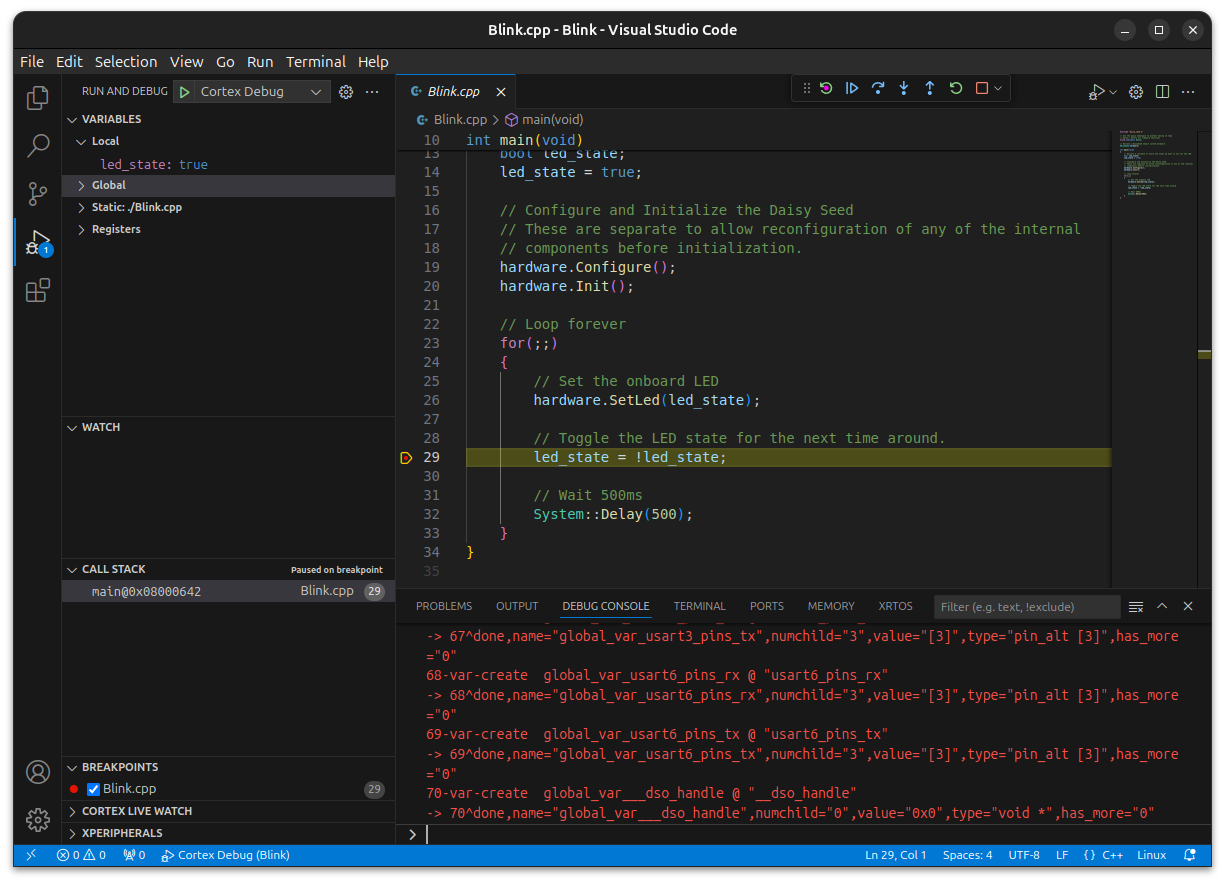
The ONLY way to debug ^^