Hello everyone!
We’re planning on making a video about audio I/O and custom JSON file in the near future (I actually have both scripts nearly complete!). In the meantime, I wanted to put together a quick guide on how to set up a custom JSON file for the Daisy Seed so that you can control your synth with a sensor!
The goal of this tutorial is to change the pitch of an oscillator by twisting a potentiometer that you connected to the Seed!
Let’s get started!
–
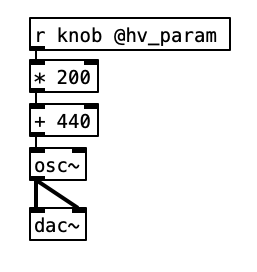
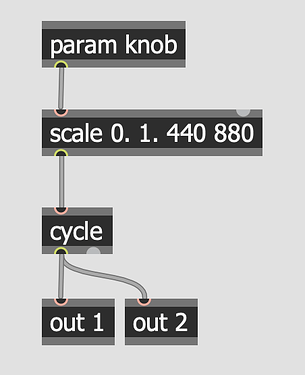
Here, we have [r knob @hv_param] for pd2dsy and [param knob] for Oopsy, in which “knob” is the argument. The idea is that we want these objects to output 0.0 to 1.0 when we twist a potentiometer that’s connected to the Daisy Seed in the physical world.

But, flashing this patch without any custom JSON won’t do anything. So, let’s have a custom JSON that will get this working!
Here’s customseed.json
Note: You may encounter a compiler error if you have a space in your .json file name.
{
    "name": "customseed",
    "som": "seed",
    "components": {
        "knob": {
            "component": "AnalogControl",
            "pin": 15
        }
    }
}
You can copy and paste this into a .txt file (plain text and not rich text) using TextEdit for example. And you can simply change the extension from .txt to .json.
You may have noticed that there’s “knob” in this JSON file. As you guessed it, that corresponds to "knob" in the [r knob @hv_param] object and [param knob] operator!
But how does it know which pin the potentiometer’s analog out is connected to? That’s where that "pin": 15 comes in.
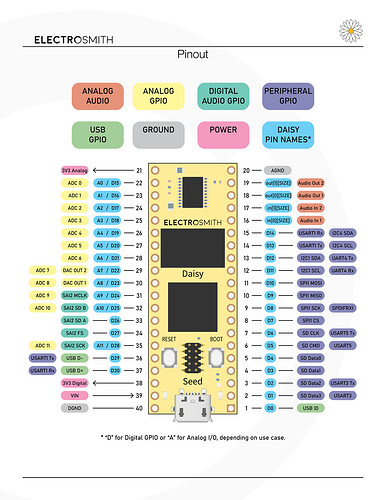
pin 15 corresponds to ADC 0 on the Daisy (please see the attach diagram. A0 = D15). I’m assuming you have a bit of electronics experience (like using an Arduino), so that’s where the potentiometer’s analog out pin should be connected to. If you are not sure about this part, no worries! I’m going over electronics basics in the upcoming video. And you may find this video helpful in the meantime.
So! After connecting the potentiometer to ADC 0, 3.3 volt, and ground (also don’t forget to bridge the DGND and AGND together in order for the analog value to be read effectively), you can now flash to the Daisy!
For pd2dsy, select the .pd and .json files in pd2dsyGUI (or plugdata) similar to how you did with the blink tutorial.
For Oopsy, flash the gen~ patch with the customseed.json (using the Browse button) selected.
I’m gonna assume that you have the audio jack(s) connected to the Daisy (I show this briefly towards the end of this video, but I’ll go over this in more detail in the upcoming audio IO video).
After the program is flashed, you can twist the knob and the pitch of the oscillator should change!
What about adding more sensors?
Here’s an example of what that would look like!
{
    "name": "customseed",
    "som": "seed",
    "components": {
        "knob": {
            "component": "AnalogControl",
            "pin": 15
        },
        "ribbon1": {
            "component": "AnalogControl",
            "pin": 16
        },
        "ribbon2": {
            "component": "AnalogControl",
            "pin": 17
        },
        "fsr1": {
            "component": "AnalogControl",
            "pin": 18
        },
        "fsr2": {
            "component": "AnalogControl",
            "pin": 19
        }
    }
}
Referencing the JSON files for other Daisy products, like Daisy Pod, is helpful by the way! Here’s where you can find them.
Let me know if you have any questions!

