Yes, these are good advices. My capacitors were 100 µF, but I’ll try with larger capacitors too.
Anyway here is my noise gate code. All the instructions are in comment in the main.cpp file, but I’ll reproduce them below too:
Noise gate example and calibration application for the Electro-Smith Daisy
NoiseBleach is an 8-band noise gate. It is some kind of intermediate solution between a standard noise gate and an FFT-based noise removal. It has more or less the best of both worlds.
Each frequency band has its own threshold and gate time. The former can be configured at any time, and the latter is automatic.
Even if the default configuration works, you should take the time to calibrate the gate and find the optimal values for your hardware settings.
Compile with:
C_INCLUDES ?= -I.
C_DEFS ?= -DNDEBUG
OPT ?= -O3
You may have to add CPPFLAGS += --std=c++14 too, but this should work without it on any recent compiler.
The code makes intensive use of debugging assert(), so remove them with -DNDEBUG in production. A single channel uses about 14% of the CPU with a block length of 48 samples. You can reduce the number of bands to save CPU, but this will lower the noise efficiency.
This class was initially part of a larger code base, hence the weird dependencies I tried to group and minimize. It’s not made for Daisy but the portable parts including the DSP bits work fine, or require minute adjustment.
Calibration procedure
You’ll need:
-
The regular audio source for your setup (a guitar, a console output, whatever). Of course you can do it without, it’s just that it won’t take the source noise into account, only the Daisy environment.
-
Something to record the output of the Daisy. No super spec is required, just the bare minimum.
-
An audio file editor to check the recording, preferably with a spectral display (it’s easier but not mandatory at all)
-
And of course your Daisy hardware.
First, set the #define CALIBRATE_NOISE_BLEACH after the #include list in main.cpp. Compile and upload the program to your Daisy.
Run the test with an instrument plugged to the Daisy Seed left input. It should remain as silent as possible (put a sock between the strings of your guitar) but not muted at the volume pot.
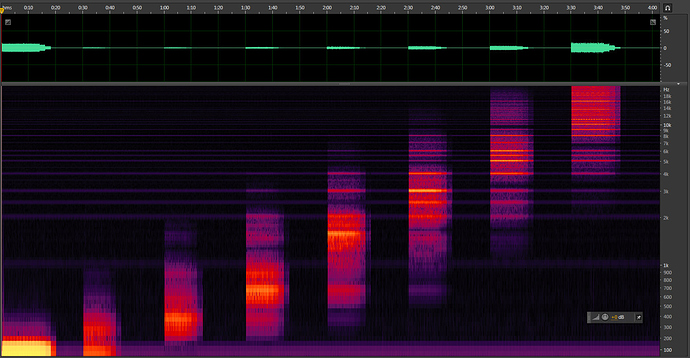
Record the output and press the Reset button to start the run. Wait for 4 minutes and stop the recording.
Open the file in your audio editor. For simplicity, trim the file at the reset “plop”. This will be easier to measure the time offsets.
The 8 frequency bands are swept in ascending order, one after each other. They starts from -144 dB and the threshold is increased by 6 dB every 2 seconds. There are 15 steps, so this is 30 s per band. Normally, each band should start at full volume. At a given time, it starts to fade out step by steps, then finally becomes silent.
For each band, find the moment where it becomes silent. It’s easier to check with a spectral display rather than a waveform. Subtract this moment from the band time offset. Divide by 2 this duration in seconds to get a step index, multiply by 6 to get a dB value, then subtract 144. This is your threshold level in dB. Then convert it to a linear scale.
step      = (time_silence - time_band_beg) / 2
level_dB  = 6 * step - 144
level_lin = pow (10, level_db / 20)
Once you’ve done this for the 8 bands, report the value in the nzbl_thr_arr array which is used to initialize the NoiseBleach objects. You can tweak the value at your taste to let pass a bit of noise and increase slightly the sustain.
I also have a class called NoiseChlorine, working the same way but with weaker filters, and lower on CPU load. If anyone is interested, I can share it too.
