I added more directions on how to install the prerelease in the original post.
For the Bootloader, please follow these steps:
- The JSON files should be in the source folder of the oopsy package. You can create a new custom JSON or just use a JSON file that’s already there. For example, I’m using the pod.json file. In the top-level item of that file, add the line
app_type": "BOOT_SRAM. So in pod.json, it looks like this.
{
	"name": "pod",
	"som": "seed",
	"app_type": "BOOT_SRAM",
	"defines": {
		"OOPSY_TARGET_POD": 1,
		"OOPSY_TARGET_HAS_MIDI_INPUT": 1,
		"OOPSY_HAS_ENCODER": 1
	},
	"max_apps": 8,
	"display": {},
	"audio": {
		"channels": 2
	},
	"components": {
		"sw1": {
			"component": "Switch",
			"pin": 27
		},
		"sw2": {
			"component": "Switch",
			"pin": 28
		},
		"knob1": {
			"component": "AnalogControl",
			"pin": 21
		},
		"knob2": {
			"component": "AnalogControl",
			"pin": 15
		},
		"encoder": {
			"component": "Encoder",
			"pin": {
				"a": 26,
				"b": 25,
				"click": 13
			}
		},
		"led1": {
			"component": "RgbLed",
			"pin": {
				"r": 20,
				"g": 19,
				"b": 18
			}
		},
		"led2": {
			"component": "RgbLed",
			"pin": {
				"r": 17,
				"g": 24,
				"b": 23
			}
		}
	},
	"aliases": {
		"switch": "sw1",
		"button": "sw1",
		"switch1": "sw1",
		"button1": "sw1",
		"switch2": "sw2",
		"button2": "sw2",
		"encswitch": "encoder_rise",
		"enp": "encoder_press",
		"press": "encoder_press",
		"knob": "knob1",
		"ctrl": "knob1",
		"ctrl1": "knob1",
		"ctrl2": "knob2",
		"led": "led1"
	}

}
Notice the newly added app_type”: “BOOT_SRAM at the top.
-
With your Daisy in the physical world, put it into bootloader mode (DFU in FS Mode) as usual by press and hold boot, press and hold reset, let go of reset, and let go of boot. Then, go to Daisy Web Programmer, click “Connect” and choose Daisy, click “Flash Bootloader Image” in the “Advanced”. Now, Daisy bootloader is flashed on your Daisy!
Update: Web Programmer has been updated in May 2025. The Daisy Bootloader is located in the Bootloader tab and you need to flash v5.4. -
And then, press and let go ‘reset’ and then press and let go ‘boot’. You should see your LED breath or slowly glow and fade repeatedly. This indicates that Daisy bootloader is ready!!
-
Open up the oopsy max patch of your choice. Then, choose that custom JSON file using the “Browser” button. You may need to expand that window to see the “Browser” button.
-
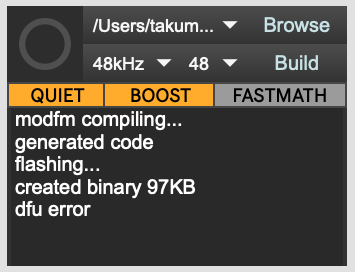
Finally, click on the button object as usual and it should flash using the Daisy bootloader. It might say ‘DFU error’ at the end but it seems to flash successfully. Let me know if it does for yours too.
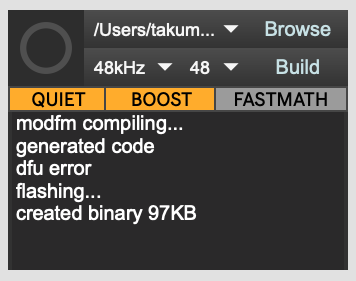
To confirm adding that line in the JSON file is what made this process work, I tried step 3 through 5 WITHOUT the app_type”: “BOOT_SRAM in the JSON file and it did NOT flash successfully. The following gets displayed. It’s slightly different from the previous one. And if I remember correctly, Daisy’s LED just continued to breath…
And you can keep using the Daisy bootloader without needing to flash the Bootloader Image every time.
So simply follow step 3 through 5 (no need to do step 2).
UNLESS, you go into DFU in FS Mode and, let’s say for example, flash a blink example into the internal flash. Then, you have to flash the Bootloader Image if you want to use the Daisy Bootloader again (so go back to step 2). To check if your Daisy has bootloader on it or not is to do step 3 and see if the LED slowly glows or not.
Let me know if you have any questions. And please feel free to share with us what you think especially if you were able to flash a program that’s bigger than 128KB!