libDaisy: Automated hardware tests

Hi there! :wave:

This is one for the nerds :nerd_face:

A couple of days ago @shensley and I talked about the vague possibility of automated CI tests on actual hardware; that is: running some automated tests on an actual Daisy Seed whenever someone makes a pull request.

It sounded like a pipe dream to me, but the more I think about it, the more I’m starting to like the idea. It sounds like a fun challenge to set this up, but it would also be very benefitial for the project. I think it would remove A LOT of work going forward - painful manual testing of SPI, I2C, audio, etc. could be entirely replaced with automated tests. I haven’t seen anything like this on another open source “hardware” project before, but imagine how cool it would be! :nerd_face: If that doesn’t make your heart beat fast with excitement, I don’t know what will :smiley:


In this thread, I’d like to write down some of the thoughts I had. It would be wonderful if some other people would chime in on this idea. It’s a lot of work for a single person, but we can nicely split this into smaller chunks and spread the work across many shoulders.

So, here’s what I have in mind:

  • A raspberry pi (or a similar low-spec computer) is connected to one or more Daisy Seeds. The Seeds are connected in various ways (audio loopback, SPI-interconnection, maybe even additional hardware/chips, such as shift registers, etc.). The whole assembly could just be a breadboard + the raspberry pi mounted on a wooden board.
  • The Raspberry Pi runs a small Jenkins Server. This server is accessible 24/7 from the web via dynDNS. I’ve set something like this up before, and its actually very easy to do. Eventually, it would be a normal web server URL like this: https://libdaisy-hardware-test.electro-smith.com
  • On this Jenkins instance, we have a special build job, that can be triggered from our github actions in the libDaisy repo (e.g. with this plugin).
  • This job clones the libDaisy repo and starts executing tests on the Daisy Seed(s). If the test succeed, the Jenkins Job succeeds, which in turn reports back to our github actions job in libDaisy.

With this taken care of, here’s what would happen when a pull request is made:

  1. The github actions in the libDaisy repo connect to the raspberry pi via the known URL, e.g. https://libdaisy-hardware-test.electro-smith.com and start the job. The job parameters are the libDaisy repo URL and the commit hash to build.
  2. The raspberrypi checks out the desired commit from the repo and starts running the tests.
  3. Eventually, the tests complete and the jenkins job finishes with a result.
  4. The github actions in the libDaisy repo collect the result and we can see a red/green test in the pull request.

As for the actual tests, here’s my ideas:

  • Each test has its own directory in libDaisy, with contents like this:
    • libDaisy/.../<myTestName>/firmware/*
      • a normal makefile firmware project with a main.cpp, Makefile and some other files for the test.
      • If multiple Daisy Seeds are involved in the test, multiple firmware-folders may exists
    • libDaisy/.../<myTestName>/runTest.py
      • This is the entry point for the test.
      • The script does something like this:
        • build the firmware
        • flash to Daisy Seed
        • send “start” command over USB-UART
        • wait until result is received over USB-UART (or timeout)
  • To make the individual tests clean and short, we could have some shared test tooling like this:
    • libDaisy/.../tooling/*
      • Contains helper code that’s used on the firmware side of the tests, e.g. functions for the communication with the Raspberry Pi like waitForTestStart(), finishTest(Result::failure)
      • Contains helper code for the jenkins-side of the test, e.g. Python functions like buildAndFlashFirmware(firmwarePath), runTestAndGetResult()

The whole setup should be easily reproducible by anyone.

  • The hardware setup is clearly documented (what’s connected to what?)
  • The raspberry pi setup should be available as a setup.sh script in libDaisy. Ideally, you’d only need to boot into raspbian and execute this script; telling it the desired dynDNS URL and credentials; the script installs all dependencies and reboots the raspberry pi. Jenkins is automatically started and the dynDNS is ready to go.

I think this sounds like a fun challenge!
Who’s in? Lets go! :nerd_face: :rocket:

1 Like

As a little followup:

Here’s what I imagine a test to look like (let’s assume this test plays some audio on the left and right channels, while the Seeds audio inputs are wired to the audio outputs)

libDaisy/hardware_tests/tests/audio-loopback/firmware/main.cpp:

#include <daisy_seed.h>
// common Hardware Test (HaT) tooling in the hat:: namespace
#include <daisyHat.h>

void main()
{
    // initialize USB-UART communication
    hat::setup();
    // wait for jenkins server to actually start the test
    hat::waitForTestStart();
    // setup the peripherals for the test
    initializeAudio();
    // run audio from the daisy output to the daisy input and check the results
    bool result = true;
    result &= testPlayAndRecordOnLeftChannel();
    result &= testPlayAndRecordOnRightChannel();
    // send the results back to the jenkins via USB-UART 
    // and trap the mcu in a while(1); loop
    hat::finishTest(result 
                    ? hat::Result::success 
                    : hat::Result::failure);
}

libDaisy/hardware_tests/tests/audio-loopback/runTest.py:

import daisy_hat # import test tooling

def runTest():
    # build and flash the firmware from the "firmare" folder
    daisy_hat.buildAndFlashFirmware("firmware")
    # start the test execution on the Daisy Seed via USB-UART
    # and wait for the test results
    return daisy_hat.runTest(timeout=10000)
1 Like

I started working on some ideas here:

1 Like

I find this to be a great idea. I know PlatformIO has documented infrastructure for this type of thing in place.:

https://docs.platformio.org/en/latest/plus/unit-testing.html

…but PlatformIO ist mighty opinionated. It’s probably best to just glean what seems good from the docs and implementation.

I’m spread pretty thin right now so I can’t help much for a few weeks. But I’d like to see this happen, and will help where I can.

edit: Just discovered your slack thread, you guys seem have a good bead on where to start.

1 Like

A little update:
We gathered a lot of ideas in the slack thread.
Here’s the gist:

  • @raf is planning something similar. Though at the integration test level, many of the challenges will be the same. We’re checking out how to join forces and share efforts as much as possible.
  • No separate Jenkins will be required. We can directly integrate a Raspberry Pi as a GitHub actions runner. That removes a lot of the trouble already, YES YES YES!
  • I started to write the device-side daisyHat library. It’s basically a collection of functions that provide basic unit testing assertion macros like EXPECT_EQ as well as some basic USB UART logging that we can read from the raspberry pi to check if the test was successful.
  • The daisyHat library is configured with CMake and comes with CMake functions to quickly register a test firmware in the CMake world. Ultimately this will allow to run the CMake test runner on the Raspberry Pi - which will then compile and upload and run all the tests.
  • I started with some basic python functions for the Raspberry Pi that read the console output from the Daisy Seed and handle other “test runner side”-tasks. I plan on providing simple runner acripts that can be the default entry point for each CMake test. Such a script will upload the firmware and wait for the results. As I imagine it, this will already be enough for some basic tests.for more advanced testing (e.g. involving multiple Seeds or other hardware) we can always use a custom runner script.

I think if we use “daisyHat” as a generic testing platform we could define various hardware setups that need to be available on a daisyHat test runner. E.g. we could have one daisy seed (let’s call it Alice) that has one set of hardware connections (audio loopback, a shift register, etc.). Then we could have another seed (let’s call it Bob) that has some other connections. Then a test could upload it’s firmware to the specific seed(s).

1 Like

Another update: I have a proof-of-concept up and running in the repo: GitHub - TheSlowGrowth/daisyHat: Automated hardware testing for Electro-Smith Daisy

Here’s a snippet of the example tests from the repo:

CMakeLists.txt

project (daisyHatExamples)
cmake_minimum_required(VERSION 3.19)

include(CTest)

# include libDaisy and daisyHat
add_subdirectory(${LIBDAISY_DIR} libdaisy)
add_subdirectory(../ daisyhat)

# include the tests
add_subdirectory(test1)
add_subdirectory(test2)

test2/main.cpp

#include <daisy_seed.h>
#include <daisyHat.h>

daisy::DaisySeed seed;

int main()
{
    seed.Configure();
    seed.Init();

    daisyhat::StartTest(seed, "test2");
    int a = 1;
    int b = 2;
    EXPECT_EQ(a, b);
    daisyhat::FinishTest();
}

test2/CMakeLists.txt

daisyhat_add_test(
    NAME test2
    SOURCES 
        main.cpp
)

Obviously, this test will fail. There’s an almost indentical test in the test1 folder, which compares 1 with 1 and thus succeeds.

Here’s what running this suite of tests looks like on my host machine (note that the test output will only be printed to the console when the test fails, thus we only see the full output for test2):

Click to expand ...
ctest --output-on-failure

Test project C:/Users/johannes/Documents/Repos/daisyHat/build
    Start 1: test1
1/2 Test #1: test1 ............................   Passed    8.02 sec
    Start 2: test2
2/2 Test #2: test2 ............................***Failed    8.03 sec

-----------------------------------------------------------------------
Uploading firmware image ...
-----------------------------------------------------------------------

command:
['openocd', '-s', '/usr/local/share/openocd/scripts', '-f', 'interface/ftdi/olimex-arm-usb-tiny-h.cfg', '-f', 'target/stm32h7x.cfg', '-c', 'program "C:/Users/johannes/Documents/Repos/daisyHat/build/test2/test2.elf" verify reset exit']
xPack OpenOCD, x86_64 Open On-Chip Debugger 0.11.0-00155-ge392e485e (2021-03-15-16:44)
Licensed under GNU GPL v2
For bug reports, read
        http://openocd.org/doc/doxygen/bugs.html
Info : auto-selecting first available session transport "jtag". To override use 'transport select <transport>'.
Info : clock speed 1800 kHz
Info : JTAG tap: stm32h7x.cpu tap/device found: 0x6ba00477 (mfg: 0x23b (ARM Ltd), part: 0xba00, ver: 0x6)
Info : JTAG tap: stm32h7x.bs tap/device found: 0x06450041 (mfg: 0x020 (STMicroelectronics), part: 0x6450, ver: 0x0)
Info : stm32h7x.cpu0: hardware has 8 breakpoints, 4 watchpoints
Info : starting gdb server for stm32h7x.cpu0 on 3333
Info : Listening on port 3333 for gdb connections
Info : JTAG tap: stm32h7x.cpu tap/device found: 0x6ba00477 (mfg: 0x23b (ARM Ltd), part: 0xba00, ver: 0x6)
Info : JTAG tap: stm32h7x.bs tap/device found: 0x06450041 (mfg: 0x020 (STMicroelectronics), part: 0x6450, ver: 0x0)
target halted due to debug-request, current mode: Thread
xPSR: 0x01000000 pc: 0x08004878 msp: 0x20020000
** Programming Started **
Info : Device: STM32H74x/75x
Info : flash size probed value 128
Info : STM32H7 flash has a single bank
Info : Bank (0) size is 128 kb, base address is 0x08000000
Info : Padding image section 1 at 0x0800af78 with 8 bytes (bank write end alignment)
Warn : Adding extra erase range, 0x0800af80 .. 0x0801ffff
Info : DAP transaction stalled (WAIT) - slowing down
** Programming Finished **
** Verify Started **
** Verified OK **
** Resetting Target **
Info : JTAG tap: stm32h7x.cpu tap/device found: 0x6ba00477 (mfg: 0x23b (ARM Ltd), part: 0xba00, ver: 0x6)
Info : JTAG tap: stm32h7x.bs tap/device found: 0x06450041 (mfg: 0x020 (STMicroelectronics), part: 0x6450, ver: 0x0)
shutdown command invoked


-----------------------------------------------------------------------
Running test on device 'COM4' ...
-----------------------------------------------------------------------

>>> === Starting Test ===
>>> > Name: test2
>>> ===
>>> FAILURE: Expected a == b
>>> Where
>>>      a = '1',
>>>      b = '2'
>>> === Test Finished ===
>>> > numFailedAssertions = 1
>>> > duration = 3902 ms
>>> > testResult = FAILURE


50% tests passed, 1 tests failed out of 2

Total Test time (real) =  16.07 sec

The following tests FAILED:
          2 - test2 (Failed)
Errors while running CTest
The terminal process "C:\WINDOWS\System32\WindowsPowerShell\v1.0\powershell.exe -Command ctest --output-on-failure" terminated with exit code: 1.
2 Likes

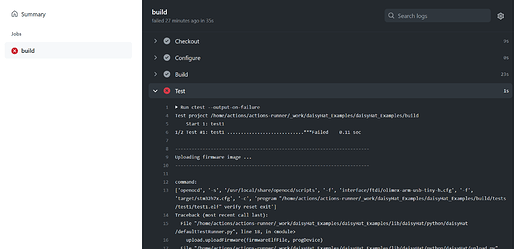
Now that the physical tests are in a drafty-hacky-kind-of-working state, I worked on the github integration:

  • I now have a docker container that registers itself as a github runner and comes with all the dependencies to build and run the tests. This will offer a clean and safe build environment for each workflow run, as we can simply cleanup the container after each run and start a new one for the next run (much like github does with its own runners). We can also heavily restrict network access from inside the container, making it pretty safe.
  • I made a little python app that can spin up / shut down the container over a web API, right now https://localhost:5000/start and https://localhost:5000/stop. Ultimately, this will be called from the github actions to spin up the runner at the start of the workflow.
  • I tested the docker container in a Ubuntu-VirtualBox on my Windows machine. It appears in github and happily builds my little test repo, but then failsat the “Test” stage because the physical USB devices are not yet passed through the two virtualization layers (windows->VirtualBoxUbuntu->DockerContainer).
  • I don’t have my Raspberry Pi yet, but I suspect things will be a little easier to setup there so I won’t dive into the whole device passthrough desaster just yet

What’s left to do:

  • transfer the container to run on the Raspberry Pi (should hopefully be straight forward)
  • pass through the USB devices (programmer & Daisy USB-serial) in a way that can handle them being unplugged and replugged while the container is running
  • do some hardening on the container (restrict network access to github URLs only)
  • expose the web API that starts and stops the container so that we can do that from the github workflow. Maybe we can skip this step and have the container restart automatically after each workflow run. That should be possible but I’m afraid that this is not reliable enough.

We’re getting close to a MVP. It’s still a bit rough around the edges but it looks promising

2 Likes

It’s been a while but here’s an update:

  • The container that runs the github actions is now migrated to work on the raspberry pi
  • I found a way to automatically cleanup and restart the container after each CI job, making it safer to use on a public repo.
  • I managed to passthrough the USB devices into the container without exposing anything else from the host OS and impacting security (Spoiler: It’s a proper PITA)
  • I updated the setup scripts so that you essentially only need to run a single bash script to turn a stock raspberry pi into a daisyHat test runner

So at this point, I can develop code, push it to a test repo and see how the Raspberry Pi starts executing. It’s MAGIC :slight_smile:

The current state is publicly available in the daisyHat repo. I have a small test repo with some tests and the github actions yaml which I’m using to experiment. I’ve configured this test repo as private right now until I’ve done further security testing. If someone’s interested in taking a look, let me know.

Now on to the polishing…

4 Likes

Another update:

  • @recursinging tried out the Raspberry Pi based test runner and got some automated tests working. Some issues were found and fixed, thanks for the contribution! :tada:
  • I implemented a signalling API that allows the Seed to wait for signals from the host and vice-versa. This allows to synchronize the host and the Seed(s) during the test execution, e.g. when the host needs to reconfigure an external test fixture. Here’s an example that uses the signalling API.
  • I provided more options for different test types:
    • Tests can now have custom test runners on the host
    • Tests can now use multiple seeds in parallel
    • The CMake functions for registering tests have been improved
    • Here’s a brief documentation
  • There’s now a config file daisyHat.config.json that specifies the hardware setup. This file is used to give a name to each Seed in the setup and define what programmer and serial port is associated with it. It simplifies writing the tests, as you only need to define which Seed to upload to and everything else can be done under the hood.
  • The configuration file can be overwritten by setting an environment variable. This can be used to provide an alternative configuration for running the tests locally (outside of CI) where the paths to the serial devices are likely different than on CI.

I’m still waiting for some pull requests in libDaisy. Until then, the current state can be found here:

2 Likes

Oh and if you’d like to write a little test for yourself, please feel free to fork daisyHat_Examples and create a pull request. Ping me on Slack and I’ll boot the Raspberry Pi so you can see your tests in action :slight_smile: