Just sharing this walkthrough I did for setting up MacOS with VSCode, STLinkV3, and OpenOCD with the Cortex Debugger for the Daisy Seed:
5 Likes
This is a great guide. 
Worth mentioning that for some (those unfamiliar with node, npm, etc.) the Manual install steps for openocd may be a little more accessible. (And if you’re not using Eclipse, much simpler to use a standard folder, like Documents, Developer, etc. for the install, but your mileage may vary if you have other versions or a lot of other tools).
I swear I found a brew formula for the xpack distribution of openocd a while ago as well, but I haven’t been able to find it lately.
edited for notes on the manual install
3 Likes
This is a solid guide
Worked like a charm, but one extra thing I had to do is add DEBUG = 1 to my projects Makefile, which was pointed out by adam_f over on this thread.
Thanks a bunch!
1 Like
You can also run DEBUG=1 make in the command line.
1 Like
VSCode can’t find my compiler. Any idea how to fix? I have googled everywhere.
I can make/make program and run from the command line but in VSCode when I tried to build from the command palette with task build I get
/bin/sh: arm-none-eabi-gcc: command not found
This leaves me with the LED as my only debugging tool ![]()
How do I tell VSCode how to find the compiler?
Cheers!
That error makes it seem like the installer was not installed on your machine.
You can confirm this by opening up a terminal anywhere on the computer, and running:
arm-none-eabi-gcc --version
If you get a similar command not found error, then the toolchain is not installed.
We have a few GUI installers for the toolchain now.
So if you didn’t use the previous install.command or homebrew to install the toolchain, you can download the package from the links below, and install as usual.
That includes everything you should need including arm-none-eabi GCC compiler, and openocd for debugging.
I can build and run from the command line though.
arm-none-eabi-gcc --version
arm-none-eabi-gcc (GNU Arm Embedded Toolchain 10.3-2021.10) 10.3.1 20210824 (release)
I tried a brew reinstall gcc-arm-embedded and it did update the toolchain.
arm-none-eabi-gcc (Arm GNU Toolchain 11.3.Rel1) 11.3.1 20220712
I can still build on the command line but not from VSCode.
I am using the task build from the command palette. is that the correct way to build?
VS Code should be using the same tools that get used when invoking the program via the command line in a terminal.
It’s been a little while since I’ve gone through everything on MacOS.
What version of the hardware and OS are you using (Intel/ARM, and MacOS version)?
task build (from any of the example folders) should work the same as running make clean; make in your terminal.
This should also be the same as doing the Terminal->Run Build Task (Cmd-Shift-B) menu option.
In any case, you may run into issues with v11 toolchain of the arm compiler.
I’m fairly certain the STM32 HAL files in libDaisy do not compile properly with the new version at this time.
If you’re successfully compiling the Blink example, it’s likely that libDaisy was compiled already with the older version of the compiler, and you will eventually hit random, unknown warnings, and errors.
I recommend uninstalling the gcc-arm-embedded with homebrew, and using the installer linked above to install the toolchain.
You can then try the build task once more.
Also, it is possible to use VS Code for editing the code, and running the debugger without using the tasks for compiling. (I personally have the habit of manually running the make commands myself, but still using VS code / Cortex Debug to attach the debugger.
The debugging uses openocd also installed via the Toolchain links above (and the older install.command/homebrew method).
Regardless of the compiler, you should be able to run the Cortex Debug configuration in the “Run and Debug” menu of VS Code.
hope that helps ![]()
Thanks for your help! I followed your advice re uninstalling the gcc-arm-embedded with homebrew, and using the installer linked above to install the toolchain and I can build from VSCode now.
I can’t program the device or debug from VSCode so I have posted here: Can't program daisy device from VSCode - openocd can't find libusb - Stack Overflow
Basically openocd -s /usr/local/share/openocd/scripts -f interface/stlink.cfg -f target/stm32h7x.cfg -c "program ./build/PickupMachine.elf verify reset exit" works from the command line but not VSCode.
The error I get is:
openocd -s /usr/local/share/openocd/scripts -f interface/stlink.cfg -f target/stm32h7x.cfg
-c “program ./build/PickupMachine.elf verify reset exit”
dyld[62801]: Library not loaded: /usr/local/opt/libusb-compat/lib/libusb-0.1.4.dylib
Referenced from: <2AF14ADF-FE69-3018-B458-47925DB060E7> /Library/DaisyToolchain/0.1.3-ARM/openocd/bin/openocd
Reason: tried: ‘/usr/local/opt/libusb-compat/lib/libusb-0.1.4.dylib’ (no such file), ‘/System/Volumes/Preboot/Cryptexes/OS/usr/local/opt/libusb-compat/lib/libusb-0.1.4.dylib’ (no such file), ‘/usr/local/opt/libusb-compat/lib/libusb-0.1.4.dylib’ (no such file), ‘/usr/local/lib/libusb-0.1.4.dylib’ (no such file), ‘/usr/lib/libusb-0.1.4.dylib’ (no such file, not in dyld cache)
make: *** [program] Abort trap: 6
The issue had to do with VSCode still using the old brew locations.
If I install VSCode via brew (ironically) it looks for openocd, arm-none-eabi-gcc in the old /usr/bin folder.
If I download VSCode using the Apple Silicon link at the visual studio site then it correctly uses the /opt/homebrew folder.
I also have this issue, I installed VS Code from the Visual Studio site (rather than via homebrew), so that’s not the problem in my case. I have both libusb and libocd installed via homebrew, but libocd seems to be trying to find an old version of libusb, i.e. libusb-0.1.4, whereas I appear to have 0.1.12
If I type openocd --version in terminal, I see
dyld[11037]: Library not loaded: ‘/usr/local/opt/libusb-compat/lib/libusb-0.1.4.dylib’
Referenced from: ‘/Library/DaisyToolchain/0.1.3-ARM/openocd/bin/openocd’
Reason: tried: ‘/usr/local/opt/libusb-compat/lib/libusb-0.1.4.dylib’ (no such file), ‘/usr/local/lib/libusb-0.1.4.dylib’ (no such file), ‘/usr/lib/libusb-0.1.4.dylib’ (no such file)
zsh: abort openocd --version
This appears to be finding an older version of openocd. I assume this is because, on M1 homebrew installs to usr/local/opt/homebrew. Should I be trying to install an older version of libusb, or somehow point the tools to the new version of openocd?
I am installing to a new M1 MacBook Pro running OS 12.5 (Monterey). I installed using the new install command (previously I’d used the YouTube tutorial to setup the toolchain).
It sounds like your VSCode is pointing to the intel installation of homebrew. You probably want VSCode to use the same homebrew version as you have installed in your terminal.
You can have separate intel and m1 homebrew installs at the same time. You can type
which openocd
into the VSCode terminal and into your shell and it will tell you if they are finding different versions of openocd or if one homebrew doesn’t have it installed.
I forget the exact folders, but Intel homebrew will install into /usr/bin and m1 homebrew installs into /opt/homebrew
I just had to update VSCode and it started finding the correct homebrew. I had to go a menu in VSCode and select ‘restart to install’. For some reason installing a new version of VSCode didn’t do it.
Thanks for the super quick reply! I tried manually changing the path in the VSCode debugger settings, and in the makefile, and neither worked, but ‘restart to install’ appears to have solved the problem, and OpenOCD now loads correctly! Still can’t get debugging working, but shall investigate further…
RESOLVED (see post below)
When I try to run the debugger I see this error:
Executing task: make


 *  The terminal process failed to launch: Starting directory (cwd) "/Users/scottpitkethly/Code/GitHub/Gloop/../../Documents/Daisy/DaisyExamples/DaisySP/" does not exist.
I’m not sure what stage this is failing at. If I go to the VS Code terminal and type ‘make’ the project builds as expected. I don’t understand where it’s concatenating the DaisyExamples path onto my project path.
I suspect this may be the issue? I haven’t modified this file though…
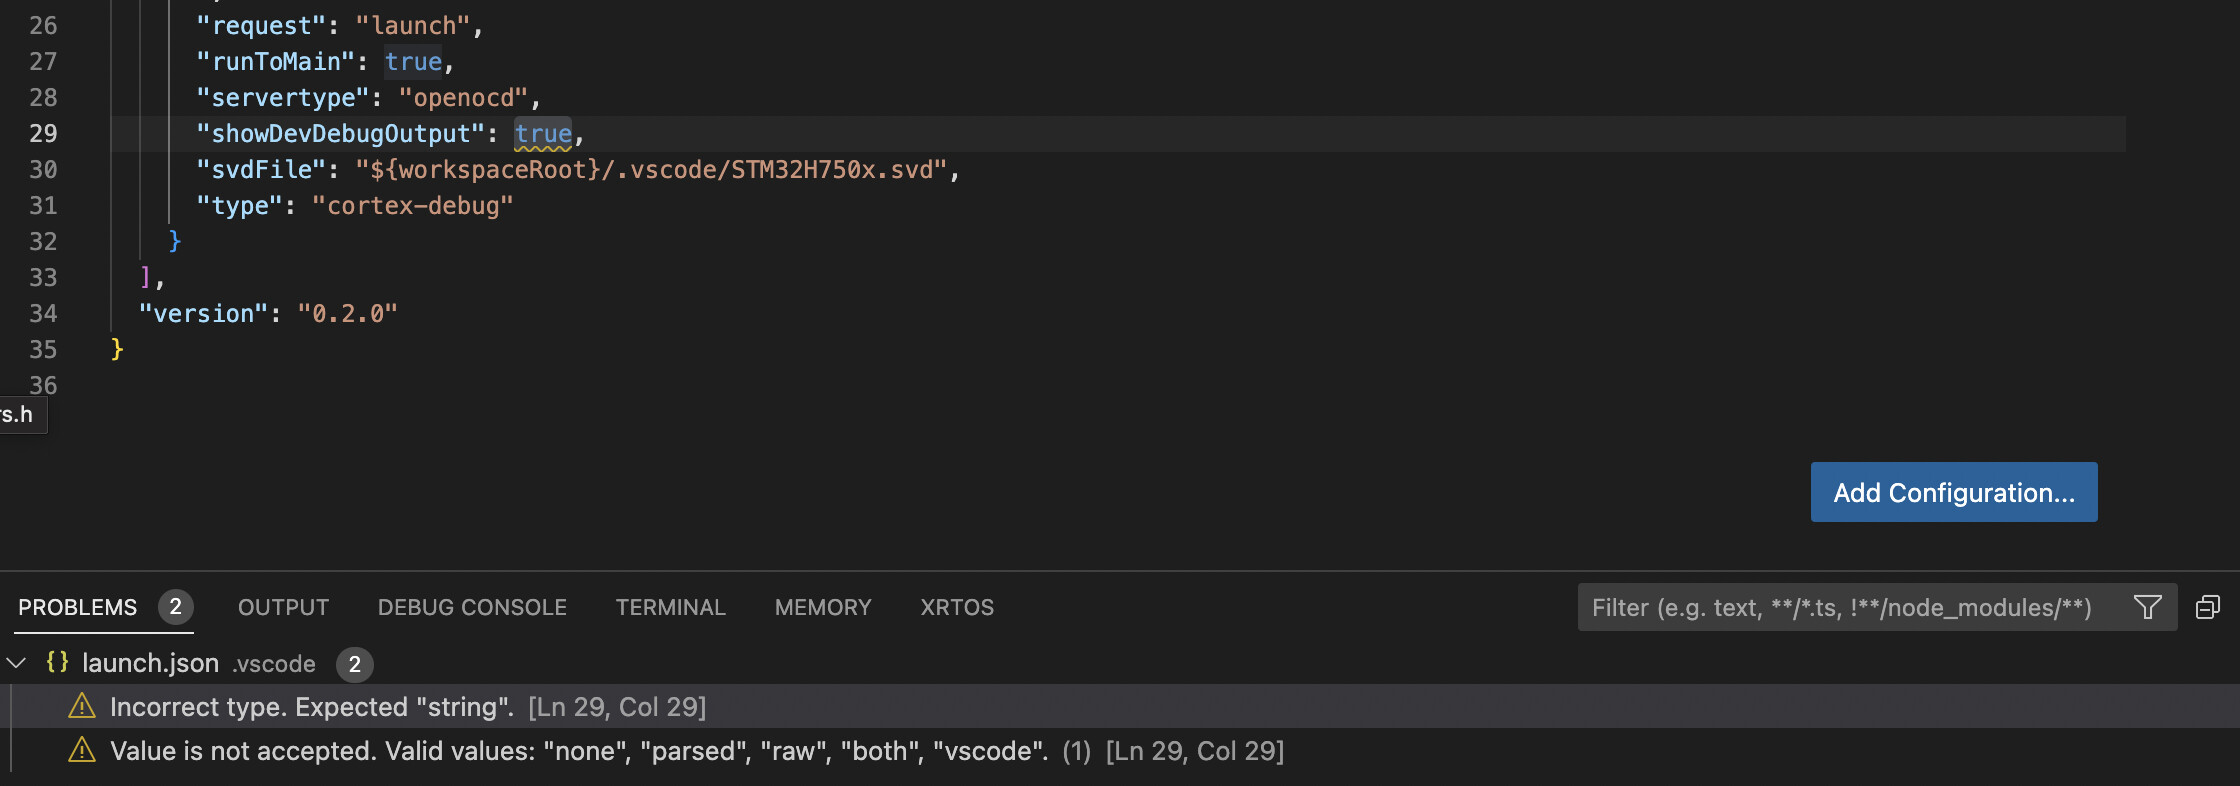
EDIT 1 - I changed the true to “vscode”, and the problem still exists…
EDIT 2 - RESOLVED - this was just due to the paths not being set correctly in the .json files
I had this same issue (Library not loaded: ‘/usr/local/opt/libusb-compat/lib/libusb-0.1.4.dylib’) on my M1 Mac and was able to resolve thanks to this comment.
My exact steps were:
brew install openocd
Go to VS Code Setting menu
Search for ‘openocd’
click ‘Edit in settings.json’ under Openocd Path
Change to “cortex-debug.openocdPath”: “/opt/homebrew/bin/openocd”
Quit VS Code and restart
Haven’t tried to debug yet.
1 Like