Since Daisy acts as a COM port with this setup, there are 2 things that are needed to get messages to the Daisy:
A virtual Midi Host that Ableton Live or any DAW can use: I used LoopMidi, which is in the reference post. After installation, you just need to add a loopback MIDI port by pressing the “+” button on the bottom left.
Secondly, you need a tool to route the LoopMidi’s messages to the Com port, for this I used Hairless MIDI Serial. This is also in the reference post, notice how “MIDI In” is set to the loopMIDI port, this is where Hairless will grab the MIDI messages from to route to the USB Serial Device.
Also note the “Serial<->MIDI Bridge On” checkbox: every time that I reset the daisy, I have to manually turn this off/on for messages, perhaps this is when Hairless opens up a connection with the Daisy’s COM port.
Lastly, in Ableton itself I have used the following settings:
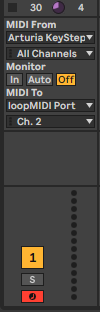
One additional caveat: it seems that the MIDI loop driver mirrors its input back to its own output, meaning that if you use “all midi ins” in Ableton, you will get a never ending feedback loop of the MIDI messages that you send to the device. To get around this, I explicitly set the “MIDI From” field, so that the loopMidi device only receives messages from the piano roll or my midi keyboard. There may be other Virtual Midi ports for Windows which do not loop messages back, but I could not find one quickly in a pinch.
Ableton’s website seems to give Loop Midi as the only 64 bit option for Windows:
https://help.ableton.com/hc/en-us/articles/209774225-How-to-setup-a-virtual-MIDI-bus
Hope this all helps.